The Tile Installation Dilemma
As a professional tile contractor serving New Jersey homeowners for years, I’ve witnessed the same scenario countless times. A homeowner stands in their outdated bathroom or kitchen, smartphone in hand, watching a 5-minute DIY tile installation video and thinking, “I could do that!” The allure of saving money on hiring a local tile contractor versus doing it yourself is understandable, especially with today’s abundance of online tutorials and big-box stores offering “easy-to-install” tile products.
But is DIY tiling really the best approach for New Jersey homes? The answer isn’t as straightforward as those quick videos might suggest.
In my experience, the decision between hiring a professional tile contractor and going the DIY route requires careful consideration of several factors specific to your situation, skill level, and the unique characteristics of New Jersey homes.
Understanding the True Costs: Professional vs. DIY Tiling

Material Costs: The Hidden Price Difference
When comparing costs between DIY and professional installation, many homeowners initially focus only on labor savings. However, there’s more to the equation than meets the eye.
As a professional contractor, I have access to wholesale pricing and industry connections that typically aren’t available to the general public. These relationships often mean I can source high-quality tiles at 15-20% below retail prices.
Additionally, professionals know exactly how much material to purchase, accounting for the necessary waste factor without excessive overbuying. DIYers, on the other hand, often either buy too little (resulting in multiple trips and mismatched lot numbers) or too much (wasting money).
Tool Investment Considerations
Professional tile installation requires specialized tools that deliver precision results. Here’s a basic list of tools needed for proper tile installation:
- Wet saw with diamond blade
- Manual tile cutter
- Tile nippers
- Notched trowels in various sizes
- Tile leveling system
- Rubber mallet
- Grout float
- Mixing tools
- Measuring equipment
Purchasing these tools for a one-time project can easily add $500-1,000 to your budget. Renting is an option, but this still adds costs and often comes with time constraints that can rush your work.
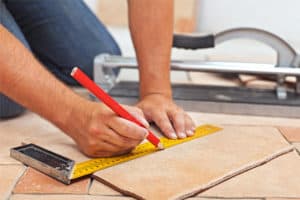
The Skill Factor: What It Really Takes to Tile Properly

The Learning Curve Reality
I often hear from homeowners who say, “It can’t be that hard – you just stick tiles to the wall.” This oversimplification undermines the years of training and experience that go into professional tiling.
Proper tile installation involves understanding:
- Substrate preparation and waterproofing
- Layout planning and pattern calculation
- Appropriate setting material selection
- Cutting techniques for different tile materials
- Proper troweling techniques
- Expansion joint requirements
- Lippage prevention methods
- Grout application and sealing protocols
Each of these skills takes considerable practice to master. While DIY videos might demonstrate the basics, they rarely cover troubleshooting the inevitable challenges that arise during installation.
Common DIY Pitfalls in New Jersey Homes
New Jersey homes present unique challenges for tile installation that many DIYers don’t anticipate:
The fluctuating seasonal humidity in our region affects drying times and can cause adhesion issues if not properly managed. Many older New Jersey homes have uneven surfaces and structural quirks that require professional assessment and preparation.
Our freeze-thaw cycles demand specific installation considerations, especially for exterior applications or unheated spaces. These region-specific factors can make standard DIY advice inadequate for New Jersey properties.
Quality Considerations: The Visible Difference

The Professional Edge
When I walk into a room, I can immediately tell whether the tile was professionally installed or DIY. The differences may be subtle to the untrained eye, but they significantly impact both aesthetics and longevity.
Professional installations feature:
- Perfectly straight grout lines
- Consistent spacing between tiles
- Properly centered patterns
- Professional transitions between different flooring materials
- Specialized cuts around fixtures and obstacles
- Even lippage control (preventing tile edges from protruding)
- Proper waterproofing behind the visible surfaces
These quality markers not only look better but also prevent future problems like cracking, loosening tiles, and water damage.
Longevity and Warranty Factors
Quality tile installation should last decades with proper maintenance. When professionally installed, you’re not just paying for today’s appearance but for years of performance.
Most professional tile contractors offer warranties on their workmanship – typically 1-5 years depending on the contractor. This provides peace of mind that isn’t available with DIY work.
If a problem develops with professional installation, you have recourse. With DIY, you’re on your own if issues arise, which could mean complete removal and reinstallation at full cost.
Project Complexity: When DIY Makes Sense vs. When to Call a Pro

Suitable DIY Tile Projects
I believe in being honest about when DIY might be appropriate. For simple projects with the right conditions, a motivated homeowner can achieve satisfactory results:
- Small backsplash installations with standard subway tiles
- Basic floor installations in non-critical areas using larger format tiles
- Tiling a simple tabletop or other decorative surface
- Adding accent tiles to an existing installation
These projects typically involve straightforward layouts, minimal cutting, and less critical waterproofing requirements.
Projects That Demand Professional Installation
However, certain tiling projects in New Jersey homes almost always warrant professional installation:
- Complete bathroom renovations, especially shower installations
- Steam showers and wet rooms
- Radiant floor heating systems under tile
- Intricate patterns like herringbone or basketweave
- Natural stone installation (marble, travertine, etc.)
- Large format tile installation (tiles larger than 12″x12″)
- Any commercial or high-traffic residential application
- Exterior tiling subject to freeze-thaw cycles
The risk of failure in these complex projects can result in water damage, mold, structural issues, and ultimately costlier repairs than the original professional installation would have been.
New Jersey Building Codes and Permitting Considerations
Navigating Local Requirements
One aspect DIYers often overlook is compliance with local building codes. In New Jersey, tile installation in bathrooms and certain other areas must meet specific requirements for waterproofing, backing materials, and installation methods.
Professional tile contractors stay updated on these requirements and know when permits are needed. This knowledge helps prevent costly violations that might only be discovered during home inspections when you eventually sell your property.
Different municipalities within New Jersey have varying requirements, so local expertise becomes particularly valuable. What’s permitted in one town might not meet code in a neighboring community.
Insurance Implications
Another consideration: some homeowner’s insurance policies may have limitations regarding claims stemming from DIY renovations, especially if they involve plumbing or waterproofing. Professional installation often provides more protection in case of water damage claims.
The Middle Ground: Hybrid Approaches
Collaborative Options
For homeowners with some DIY skills who still want professional quality, I sometimes recommend hybrid approaches:
- Preparation and finishing by owner: The homeowner handles demolition, simple substrate preparation, and final cleaning while the professional performs the critical installation work.
- Professional layout with DIY execution: Have a tile contractor mark layouts, provide material lists, and offer consultation throughout your DIY process.
- Critical areas by pros, simple areas DIY: For bathroom renovations, have professionals handle the shower and waterproofing while you tackle the simpler floor or backsplash.
These approaches can provide cost savings while ensuring the most crucial aspects receive professional attention.
Making Your Decision: A Practical Assessment
Self-Evaluation Questions
To determine whether DIY or hiring a professional tile contractor is right for your New Jersey home, ask yourself:
- How visible and important is this space to your home’s value?
- What is your genuine skill level with precision tasks?
- Do you have access to and knowledge of proper tools?
- Can your schedule accommodate potential mistakes and re-dos?
- How physically demanding will the project be?
- Does the space have waterproofing requirements?
- What would repairs cost if the installation fails?
- How long do you plan to remain in your home?
Answering these questions honestly will guide you toward the right decision for your specific situation.
Cost-Benefit Analysis Framework
I recommend creating a simple cost comparison that includes all factors:
DIY Costs:
- Materials (including 10-15% waste factor)
- Tools (purchase or rental)
- Your time (valued at a reasonable hourly rate)
- Potential costs of mistakes
- Additional materials for learning curve
Professional Costs:
- Labor and materials quote
- Value of your free time
- Peace of mind factor
- Warranty protection
When viewed comprehensively, the apparent savings of DIY sometimes diminish significantly.
Choosing the Right Tile Contractor in New Jersey
What to Look For
If you decide professional installation is the right choice, here’s how to select a quality tile contractor:
- Verify proper licensing and insurance for New Jersey
- Check reviews specifically mentioning tile installation quality
- Ask for portfolios of similar projects
- Request references from projects completed 2-3 years ago (to evaluate durability)
- Ensure they provide written estimates and contracts
- Confirm their knowledge of local building codes
- Evaluate their communication style and responsiveness
Finding the right contractor takes time, but this investment pays dividends in quality results.
Red Flags to Watch For
Be wary of contractors who:
- Provide estimates without visiting the site
- Cannot provide references or portfolios
- Require large deposits (over 30%) upfront
- Cannot clearly explain their installation process
- Seem unfamiliar with specific tile types you’re interested in
- Do not discuss substrate preparation methods
Making the Best Choice for Your New Jersey Home
The decision between hiring a local tile contractor and DIY ultimately depends on your specific situation, project complexity, and personal priorities. For simple, low-risk projects where perfection isn’t critical, DIY can be rewarding and cost-effective.
However, for most New Jersey homeowners, professional tile installation provides superior results, proper compliance with local codes, and long-term protection for your investment. The visible quality difference and peace of mind are often worth the additional cost.
Whether you choose DIY or professional tile installation, proper research and preparation make all the difference. If you’re considering professional installation, Kasco Tile is here to provide expert consultations and honest assessments tailored to your project needs.